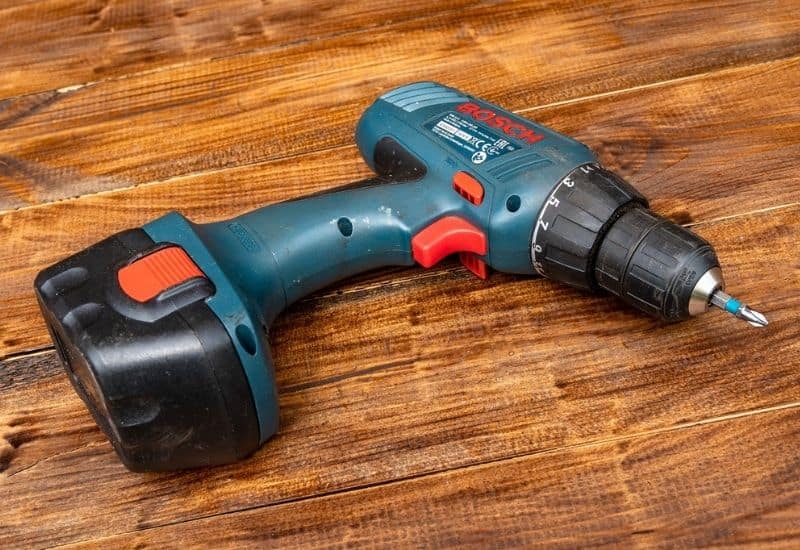
Cordless drills can put up with a lot of abuse, as they are built to be job site tough and designed to work in even the harshest of conditions.
But can a cordless drill get wet?
Today’s cordless drills can usually handle a small amount of moisture or water, thanks to built-in weatherproofing that often uses inner seals or rings to keep water, dust, and debris out.
However, in general, a cordless drill should not get wet or be used in the rain, as it can damage and even ruin the drill.
How to Dry Out Wet Power Tools
If you’re wondering whether a cordless drill can get wet.
There’s a good chance you currently holding a wet cordless drill in your hand because you accidentally left the drill out in the rain or perhaps even dropped it into a bucket of water.
So what should you do?
Well, luckily there’s a good chance you can save the cordless drill even it got wet by following the below steps.
Step 1: Remove the Battery or Power Source
The very first thing you want to do if your cordless drill or power tool got wet is to immediately remove the battery or power source from the tool.
If the tool got wet without you knowing about it, say during an overnight rain, you should still be fine, just remove the battery as soon as you discover the tool wet.
The most important thing not to do, however, is to engage the power tool or pull the trigger on the cordless drill, if it still has power, while its wet, as this can potentially damage the tool or cause it to short out.
As tempting as it might be to test the tool to see if it still works.
Step 2: Dry Off Any Excess Moisture or Water on the Outside of the Tool
The next obvious step to mitigate water or moisture from causing any further damage to the tool is to use a towel or shammy to completely wipe off the outside of the tool.
Paying close attention to any crevices or cracks and the internal battery compartment where the battery connects to the tool.
Step 3: Let the Tool Dry Out in the Sun or Use a Hairdryer
In this next step, you want to apply some heat to the outside of the drill either through direct sunlight or through a hairdryer to help dry the drill out internally in case the water was able to penetrate the outer casing on the tool.
Because while you might not be able to see any water or moisture on the outside of the drill, that doesn’t mean there isn’t any on the inside.
So by applying some heat to the outside of the drill through direct sunlight or a hairdryer the hope is that the heat will help to remove or eliminate any residual moisture or water stuck inside the tool.
Step 4: Let The Tool Completely Dry Out Over a Few Days
Once you’ve completed all the above steps, the best thing you can do for a power tool that got wet is to give it a few days to completely dry out before attempting to use the tool.
Because even if you followed all the above steps, there still might be some residual water trapped inside the drill that only a few days of drying can eliminate.
Step 5: (Optional) Open Up the Tool For Additional Drying
While this step is not always needed or required, if the tool in question was really soaked or completely submerged in water, you might want to consider opening up the tool.
So that you can visually inspect the inside to make sure there is no lingering moisture or water inside the tool before you turn it on.
If you do happen to find moisture or water inside the drill, the best thing to use to remove it is either a q-tip or a small cotton ball.
As q-tips and cotton balls are small enough to fit into tight spaces and delicate enough not to damage internal electronics.
You also might want to go over the inside of the drill with a hairdryer to fully dry out the inside.
Just make sure to use the low heat setting, if you do, so you don’t damage the wiring or electronics of the drill.
You also might want to consider leaving the drill opened up for a few days.
In order to make sure you get every last drop of moisture and water out of the drill before you close it up and turn it on.
If you do decide to open up the tool though, just remember to go slow, keep track of where everything goes (consider taking a few photos of the inside of the drill to help remember), and keep close track of all the individual parts and screws.

How Do You Waterproof a Cordless Drill?
If you’ve ever had to throw away a cordless drill after getting it wet by leaving it out in the rain or dropping it into water.
You might be wondering if there’s a way to waterproof a cordless drill.
The good news is, is that there actually is a way you can waterproof a cordless drill, which we will go over in detail below.
However, before we do, there are two disclaimers, we need to get out of the way first.
- If your drill is newer and still under warranty, be forwarned that opening up the drill while attempting to waterproof it may void the warranty.
- While the steps mentioned below will go a long way to help waterproof your drill. It’s important to remember that nothing is foolproof. So you still want to keep your cordless drill away from water and out of the rain and use these waterproofing techniques only as a fail-safe or backup plan in case your drill does get wet.
What You Will Need to Waterproof a Cordless Drill
- MG Chemicals Acrylic Aerosol Conformal Coating for Electronics (Buy on Amazon by Clicking Here)
- Dow Corning 4 Electrical Insulating Compound (Buy on Amazon by Clicking Here)
- Applicator
Step 1: Remove the Battery or Power Source from the Drill
The first thing you need to do when waterproofing your cordless drill is to remove the battery or power source from the drill.
As you never want to work on any tool while it’s still connected to a battery or power.
Step 2: Open Up the Cordless Drill
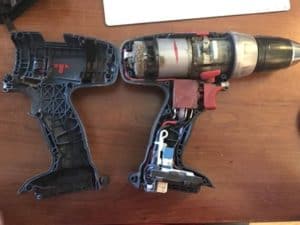 The first thing you need to do to waterproof a cordless drill is open up the drill to get to the inner electronics, which are the most susceptible to water and moisture.
For this step, it’s important to take your time, keep track of all the individual parts and screws, and take note of where everything goes.
Because the last thing you want when reassembling the drill is to have leftover pieces or parts that you can’t remember where they go.
In fact, it’s not a bad idea to take photos of the drill in various states of disassembly to help remember where everything goes and to aid in reassembly.
For detailed instructions on how to take apart a cordless drill, be sure to check out the helpful YouTube video from above.
Step 3: Spray the Internal Electronics of the Drill with an Acrylic Aerosol Conformal Coating
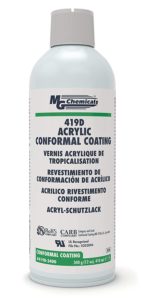 The next step is to spray all the internal electronics of the drill with MG Chemicals Acrylic Aerosol Conformal Coating.
Which will create a protective coating or barrier that will prevent water from reaching and damaging the internal electronics of the drill.
When applying the acrylic aerosol conformal coating, it’s best to apply 2 to 3 coats, as opposed to trying to coat the electronics with one heavy coat.
Once you’ve coated the internal electronics of the drill, you will know you’ve done a good job, if you can feel a hardened coating over them.
Step 4: Reassemble the Cordless Drill
Now it’s time to put the cordless drill back together.
And this is where all you’re careful and meticulous disassembly will come in handy.
As you should be able to quickly and easily put the drill back together, thanks to your attention to detail, methodical part retention, and photos you snapped of the disassembly.
Step 5: Grease the External Battery Contacts with Electronic Insulating Compound
 Now that you’ve protected the internal electrical components of the cordless drill from moisture and water.
It’s time to turn your attention to the external battery contact points both on the drill itself as well as the battery.
By applying a liberal amount of Dow Corning 4 Electrical Insulating Compound to both sets of contacts on the drill as well as the battery.
In order to keep water away from the contact points and to help prevent electrolysis.
Is There a Waterproof Drill?
While most cordless drill brands such as Dewalt, Ryobi, and Craftsmen are not meant or designed to work in or around water, there is one exception to this rule, which is the Nemo Power Tools brand.
As Nemo makes a full line of waterproof cordless power tools including a rotary drill, an impact driver, a hammer drill, an angle grinder, and even a reciprocating saw.
That is safe to use not only around water but actually underwater as well.
Nemo Power Tools are meant and designed for the boating and yachting world as well as marine research but they can also be used for any work in or around water and are great for working around pools and docks.
However, if you plan on buying a Nemo waterproof cordless drill or any of their other tools, be prepared to spend some serious money, as many of the Nemo waterproof power tools cost well over $1,000.
To see the Nemo Cordless Underwater Hammer Drill and its price on Amazon click here.
Can Milwaukee Drills Get Wet?
Milwaukee is one of the top tool brands for drills and has been making durable and reliable tools since 1924.
However, as is the case with most drills, Milwaukee drills are not meant to get wet and should be kept away from moisture and water in order to prevent damage to the drill.
Are Dewalt Tools Rain Proof?
Even though Dewalt tools are some of the most robust and heavy-duty tools out there, Dewalt tools are not rainproof and should be kept away from moisture and water in order to prevent damage to the tools.
To illustrate this point take a look at the below quote that’s directly from Dewalt support.
“Dewalt Power tools cannot be used in any type of wet condition regardless of the circumstance. Corded and Cordless tools operate with electricity which does not work in wet conditions.”
Are Brushless Tools Waterproof?
When it comes to power tools there are two types of motors used to power them.
Including brushed and brushless DC motors and each uses a different internal configuration to power the drill, as you can see from the below infographic.
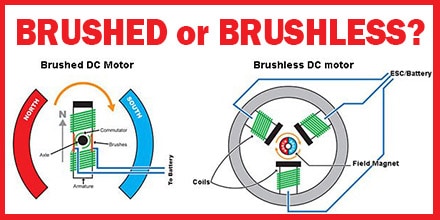
Brushed DC motors use older technology, while brushless DC motors use newer technology.
Most modern power tools use brushless DC motors for their power.
As the brushless motor offers several unique advantages over the brushed motor including higher torque to weight ratio, increased efficiency, increased reliability, reduced noise, and longer life.
But regardless of whether you have a brushed or brushless power tool, neither motor configuration makes them waterproof.
To see the best cordless drills with a light, check out our article “Top 8 Cordless Drills with Built-In Light (With Pricing)“.
Recent Posts
Your bedroom is more than just a place to sleep; it's a personal sanctuary where you can unwind, relax, and recharge after a long day. Whether working with a small bedroom or a spacious suite,...
Are you ready to breathe new life into your living room? If so, look no further than modern living room colors, as they can transform your space from drab to fab. As the heart of the home, the...